

When it comes to installing an autosteer system on a tractor, the process may seem like a daunting task at first. However, Sveaverken F100 boasts an easy GPS system installation process that even a woman alone can effortlessly set it up. Recently, on an 87-acre family farm, a women farmer Suzanne from the US tested the Sveaverken F100 Auto Steer System on her New Holland T5 tractor. In this blog, we will delve into the package of the system and provide a quick guide on how to install it for optimal performance on your farm. So, let's get started and explore what's inside the box and how to install GPS system for each component effectively.
What's In the Box
Firstly, you can check the box and take a quick look at the contents. There are brackets, a Control Terminal, an Electric Steering Wheel, a GNSS Receiver, wires for connection, and an Angle Sensor.
Electric Steering Wheel: This part allows you to have control and override the system if necessary.
GNSS Receiver: It plays a crucial role in accurately determining the tractor's position and providing precise navigation data.
Control Terminal: The terminal serves as the tractor's intelligent command center, overseeing and guiding farming operations.
Angle Sensor: It measures the position of the steering wheel, thus ensuring accurate steering.
Wiring Harness: The wires connect all the components, ensuring seamless communication and transmission of signals.
Lastly, the brackets included provide stability and ensure all components stay securely in place.

How to Install GPS System
The installation of the Sveaverken F100 Auto Steer system can be divided into six main steps. With the right tips and helpful solutions below, you'll be out on the field with your F100 Auto Steer System up and running in no time! Check the step-by-step installation guide and get on your way to a smoother and more efficient farming experience.
Step 1: Preparations
Before installing the autosteer system, it's important to ensure that the tractor is clean and free from any debris or dirt that may interfere with the installation process. Give it a thorough wash and dry before proceeding. Prepare the installation tools, such as a hexagon wrench and screwdriver, in advance.
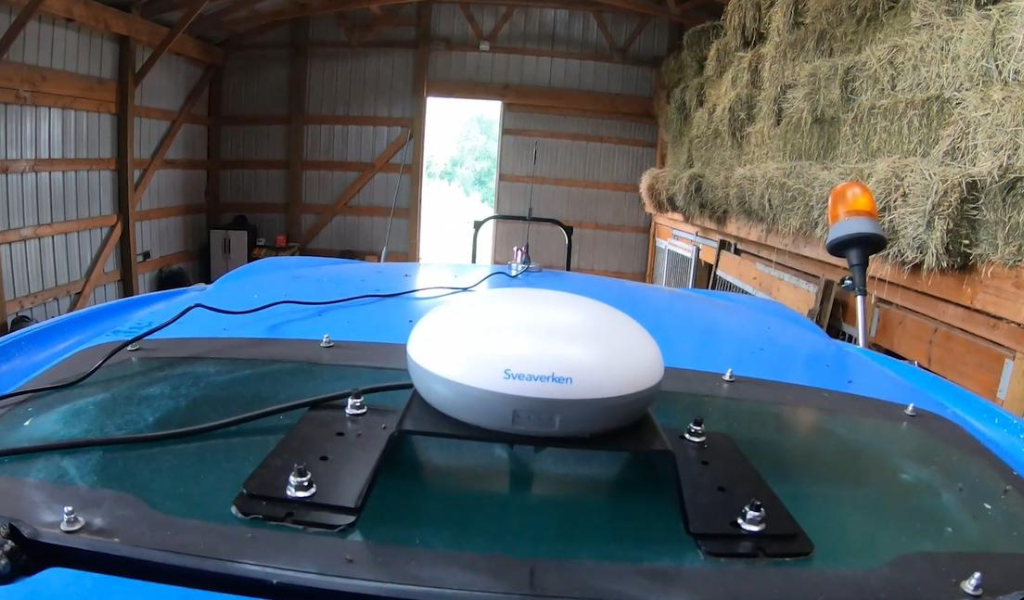
Step 2: Installing the GNSS Receiver
First, you need to install the GNSS Receiver. Locate a suitable location on the top of the tractor where there are no obstructions like a canopy or crossbars around it for accurate positioning. Install the GNSS Receiver and the antenna bracket assemblies on the center line of the axle. Please follow the instructions in the manual when connecting the cable harness and avoid forcefully pulling it out.
Step 3: Mounting the Angle Sensor
After successfully installing the GNSS Receiver, the next step is to mount the Angle Sensor. Securely attach the Angle Sensor, and ensure it is properly aligned with the front axle bearing to provide accurate feedback to the system. Then adjust the wiring harness, and install and tighten the bolt.
Step 4: Replacing the Steering Wheel
First, replace the old steering wheel on the tractor. Please refrain from discarding the unscrewed nuts for later use.
Then, install the splined sleeve onto the steering column and inspect its fit by rotating it to detect any swaying or gaps. If it is compatible, remove the selected splined sleeve from the steering column and install it into the steering motor of the Electric Steering Wheel.
After that, secure the steering motor and motor bracket using the provided screws or bolts.
Finally, position the new steering wheel carefully and ensure it is fastened for optimal functionality.
(We will confirm the compatibility of the spline sleeve and motor bracket with the customer before shipment.)

Step 5: Installing the Control Terminal
The control terminal is the interface through which you can access and control the GPS functions. Carefully position it in a convenient location within the cabin to ensure that it is easily visible and accessible. The optimal position for installation is at a 45-degree angle in the driver's line of sight. Securely attach the control terminal mounting base to the door armrest using U-bolts and nuts.
Step 6: Connecting the Wiring Harness
With the main hardware in place, it's time to connect the necessary wires. Refer to the user manual for the specific wiring diagram and follow the provided instructions carefully. Ensure that all connections are secure and properly insulated to prevent any electrical issues or malfunctions. Keep hands and feet dry and switches off during the connection process.
While you're installing, you can watch Suzanne's video tutorial to make the process more enjoyable and efficient.
Final Thoughts
In conclusion, this Sveaverken F100 GPS system installation guide provides step-by-step instructions for integrating this advanced technology into farming operations. Next blog we will check the easy How-to Guide for calibrating the system and running paths on a field, including setting up RTK signals. Stay tuned for more practical tips and quick guides to optimize your farming experience with Sveaverken!